Step by Step How I Successfully Pan Roast Coffee in 4 Easy Steps
Tools:
- Pan (Preferably a heavy cast iron pan, also I prefer a deep high sided pot style over the flatter more broad skillet shaped pans. Skillets make roasting more difficult because the beans are so spread out that they cool too fast during roasting and using a higher heat to compensate will promote scorching. I have found that using a high sided pot style pan much better for coffee roasting.) Have a new cast iron pan and need to cure it? It's easy click here.
- Stirring device (like a whisk or wooden spoon ECT. A whisk works better by far...)
- Oven thermometer (the dial type that stands up)
- Timer (best if it displays minutes and seconds and it MUST COUNT UP)
- Oven mitts (if you desire)
- 11-ounces GREEN coffee beans (this will yield slightly over one half pound of roasted coffee) *** Update: Try using only 8-ounces of green coffee. This will produce a faster roast on the same heat setting as below. Also note that the times below are for 11-ounces (by weight) of green coffee. When using 8-ounces (by weight) of green coffee first crack will be around 11 to 12 minutes. Slightly better than the 14 minutes below. ***
WARNING: Before you begin note that roasting coffee produces some smoke and therefore should only be done using proper ventilation. If possible it is advisable to roast outdoors or under a vent hood that will exhaust outside. If these are not possible then open a few windows and use a box fan as an exhaust fan to help in smoke removal. The smoke is not a real pungent smoke like the smoke of burning leaves and many people (myself included) rather enjoy the fragrance of the smoke. I roast in my kitchen without a vent hood and do just fine. Just don't be alarmed by the smoke created, it's supposed to happen!
Always roast with great care and NEVER leave coffee roasting unattended.
Roasting also produces chaff. Chaff is the brown flaky skin of the bean. The skin separates and burns or is carried off with the heat. Use caution, as chaff is flammable! Not flammable like gasoline, but flammable like dry leaves. It will burn! Luckily with pan roasting chaff is usually contained in the pan and burns and breaks up inside the bean mass (more on this later). Done properly and with care coffee roasting can be a wonderful, fun, and rewarding experience. Roast responsibly for your safety, please!
A note on using electric burners...
I have been getting quite a few emails from people who have been having difficulty pan roasting when using an electric range. In my experience I have I have only used gas and it's my impression that works best. Portable gas camping stoves are widely available and should work better (I have not tested any models) then electric ranges.
Step 1: The Set-up
Stand the oven thermometer up in the bottom of the pan and place pan on burner. Set burner to lowest available setting for starters. Preheat pan to 200F so that it takes exactly 9 minutes to reach 200F from a cold pan, if it doesn't adjust the heat so that it does, this is critical to get proper progression of the roasting. Also note that every burner will be different, for example when using my propane grill's side burner I have to use the low setting but when roasting inside on my natural gas stove I have to use a medium flame. Just remember to hit 200F in 9 minutes from a cool pan. That will assure the proper rate of roast.
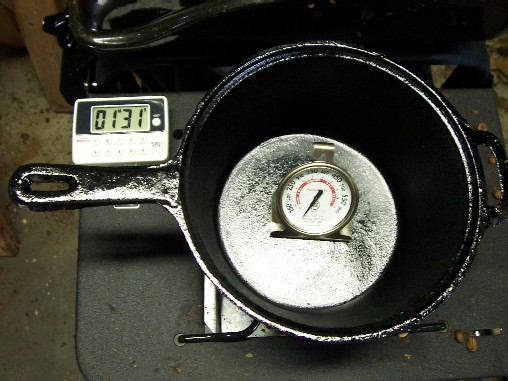
Preheating to proper temperature (I was timing to see how long it took to reach temperature).
Step 2: The Roast Begins!
When the pan reaches temperature remove the thermometer and drop beans in pan, start timer and begin stirring. To avoid scorching the beans must remain in constant motion. Now all you can do is stir, the heat will do the roasting.
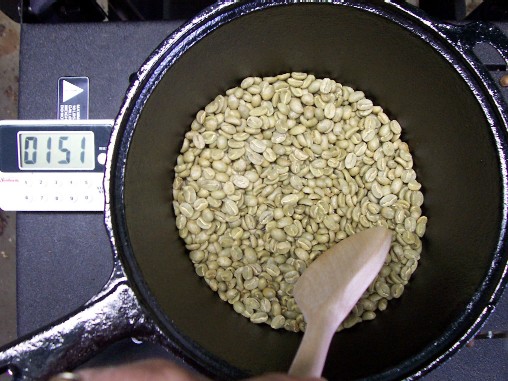
The roast at 01:51. Here we go!
Step 3: Stopping the Roast
When do you stop the roast? Well technically speaking anytime after first crack the coffee can be considered done. Lets discuss what you will see, smell and hear as the bean roasting occurs.
From start to around 7 minutes in: The beans will turn from green to a yellowish color and begin to emit steam as well as a grassy fragrance. Some beans will be starting to brown.
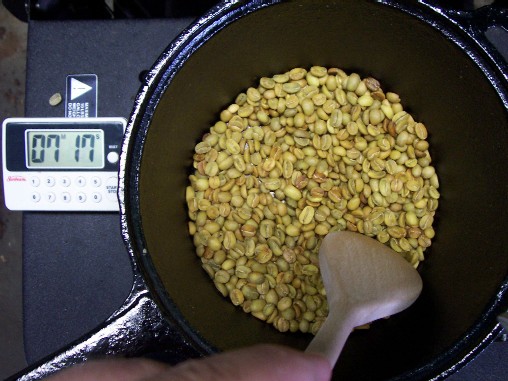
The roast at 07:17.
Notice how the green color pales to a yellow. At this point also the beans give off a wonderful grass fragrance and emit small amounts of steam vapor.

The roast at 09:34. The beans will continue to brown and begin to emit a wonderful grey smoke!
12 minutes to 13 minutes in: The beans will continue to brown and begin to emit a gray smoke. This smoke is normal and an indicator of the beans nearing first crack. First crack is the audible noise of the beans popping. This sounds much like popcorn popping. Although it is commonly called first crack, it's sounds resemble a popping sound.
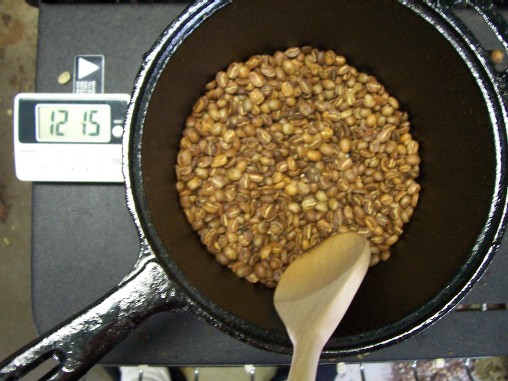
The roast at 12:15. The beans are just starting to make a few pops as first crack is about to begin.
14 minutes in: Around 14 minutes into the roast the beans will all be a brown color and first crack (the popping sound) will have reached a peak. It is after first crack has finished completely that the coffee can be stopped at anytime and be considered done (this is a New England roast, a light roast).
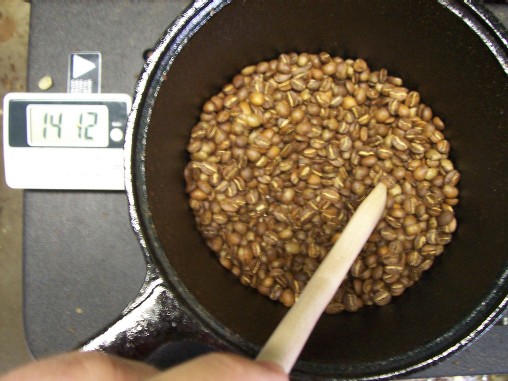
The roast at 14:12. The peak of first crack is here and the smoke intensifies.
Roast just a short ways beyond the complete stop of first crack for a City Roast (medium).
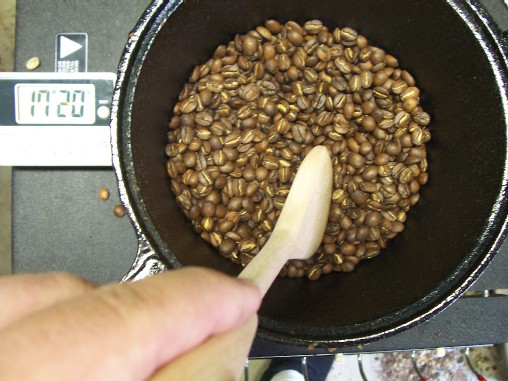
The roast at 17:20. Here first crack has completely finished yet I kept roasting until the smoke became slightly more intense in amount and in aroma. Stop around here for a City roast (medium).
Around 18 minutes: Continue the roasting and the beans will begin to smoke more heavily and the smoke will have sweetness to it in approximately 4-5 minutes after first crack. This is an indicator that second crack is about to begin. Second crack is the other and final audible sound produced during coffee roasting. It sounds much like a crackling or sizzling, such as if some one was wrinkling paper.
Stop just one or two crackles into second crack and that is considered a Full City Roast (medium dark).
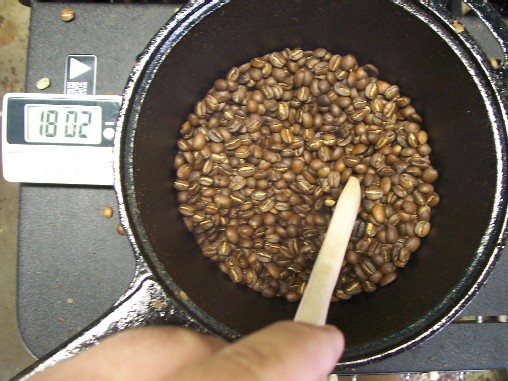
The roast at 18:02. Here the beans are just starting to crackle as second crack is about to begin. Stop here for a Full City roast (medium-dark).
Crackling will reach a peak, the beans will also begin to look glossy from the beans internal oils being drawn out. Continue until the peak of second crack for a Vienna or Light French (dark roast).
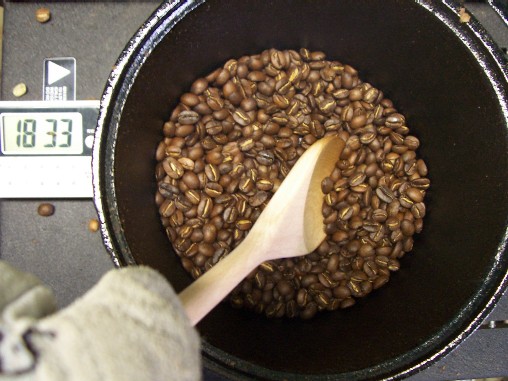
The roast at 18:33. Here is where I stopped the roast for a Full City+ or Light Vienna as second crack had begun but had not really started rolling yet.
Stop the roast at the peak of second crack for a Vienna roast (dark).
Stop just at the end of second crack for the darkest roast level often called Full French Roast (very dark). DO NOT ROAST BEYOND THIS STAGE! Doing so will result in a thin, charcoal like cup of coffee when brewed. All the oils have been burned off and the woody bean solids burned to ash.
What do the different roast levels taste like?
(A very general answer...)
The only way to understand a coffee is to roast it. Depending on how far you roast a coffee it can have a strikingly different flavor and body in the cup once brewed.
Typically speaking the lighter roasts will have more origin character (the beans actual flavors rather than roast induced flavor) and acidity with a muted body or mouth feel. However if you stop the roast too soon before the roast has fully developed the coffee will have a sour and/or grassy flavor. A hint of sourness in some coffees in my opinion can be a wonderful thing, but too much and well...YUCK!
Medium roasts can create a balance between the sometimes raw, aggressive origin character and the intense carbony roast flavors. Medium roasts will also have a heavier body than lighter roasts.
Darker roasts will have a pronounced roast flavor which are often carbony, pungent and sharp. Most of the beans flavor will have been replaced with roast flavors and body is usually at it's heaviest. But roast too far and the coffee can be destroyed, with a thin body and an ashy, charcoal and/or burnt rubber taste!
Step 4: Cooling the Beans
It is essential that the beans be cooled when you decide to stop the roast. If the beans are not cooled the heat that they have will carry the roasting process further. It is best to cool the beans to room temperature as soon as possible and preferably no longer than 3-5 minutes.
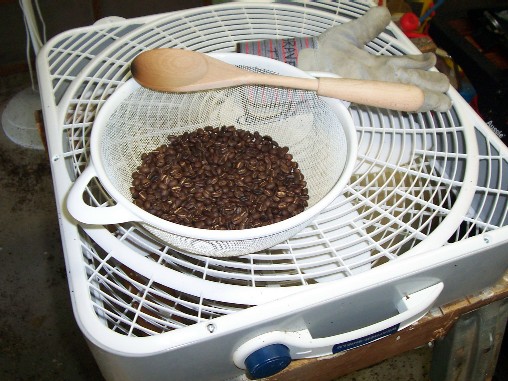
Personally I use a box fan to blow up into the beans as I stir them in a colander. This will also remove the chaff by blowing it up and all over everything. Yes, defiantly do this step outside! Just remember that it is essential to get the beans cool and remove excess chaff. How exactly you do that is up to you!

The Kenyan coffee above I pan roasted to slightly past first crack (American/light City, a light or light-medium roast)
Tips:
- For better results try to keep the roast at the proper speed. This is usually 12-17 minutes from start to finish of roast. This is considered best by most experienced roasters. Anything slower than this and you risk baking the beans and destroying the beans flavor. If you are having trouble speeding things up use fewer beans and the same heat settings as above. Using more beans and higher heat is tricky to avoid scorching. Experiment and see what works!
- Resist the urge to overload the pan with beans. It is very tempting to add more beans so that you will end up with more coffee per roasting session. However adding more beans will most likely have a negative affect on roast quality. Pan roasting is an inefficient method of roasting due to the beans being uncovered and coffee beans are already a slow absorber of heat. Too many beans will lead to baked beans and using a higher heat will lead to scorching. It's a fine line to walk but pan roasting can yield truly fantastic results with practice and patience. I have best results (best tasting and looking coffee) with the heat setting above and 8-ounces by weight green coffee beans.
- If the beans are scorching (have very dark, often black spots on them) then the heat is too hot simply try reducing the heat. Do not preheat on HIGH then roast on LOW. This will lead to scorched beans too! Scorched beans will have a negative flavor attribute that is best described as an "ashy" texture and diminished complexity in flavors. I would speculate that the woody components of the bean that are scorched or charred contribute a miniscule amount of ash to the brewed coffee. If your coffee is lightly scorched you can still drink it, but moderate or heavy scorching in my opinion ruins the coffee.
- As soon as the beans are cool store them in an airtight container (I love Mason canning jars) and put them in a dark place (like a pantry), do not refrigerate. In this stage the beans will be emitting a lot of carbon dioxide gas, a natural byproduct of the coffee roasting process. In 4-48 hours when you open that jar a loud "whoosh" and burst of a wonderful coffee aroma will be your reward and invitation to freshness! Flavor and body also develop as the oils continue to migrate outward from their hiding places in the bean. However don't be afraid to brew right out of the pan (after cooling) if you are anxious to try it, just remember that it will taste slightly different after resting.
- If the coffee tastes stale or flat after the degassing period then the roast happened too slowly, this is known as "baking" the beans. Try using slightly higher temperatures and do not take longer than 4-6 minutes after first crack to reach second crack (if roasting that far). If you duplicate the times above (better if a hair faster) then baking should not occur. Keep in mind also that the times above are relevant to the amount of green beans being used.
- Use a pan only for roasting and nothing else. This way the pan can become seasoned with the oils of coffee roasting. This is called seasoning the pan. After each roast and the pan cools simply wipe the pan clean with a DRY paper towel. It is only necessary to wash the pan if it becomes too gunk filled and interferes with the roasting by slowing it down drastically.
- I avoid nonstick-coated pans. I have heard that if heated empty the nonstick coating can emit TOXIC FUMES. Besides for coffee roasting the nonstick feature is unnecessary.
- Ambient temperatures will affect the roasting times. Roasting outdoors in cold weather for example will drastically slow the roast and probably make it impossible.
- All coffees are different and will roast differently. Some roast faster than others (like decaf beans) and some will not end with an even color (like some Indonesian coffees). With practice and taste tests you will get the hang of things!
- Visit the "Coffee Resources" linked below for more information about coffee and home coffee roasting!
The Tools I Use:
Here is a list of the exact tools that I use to successfully pan roast coffee.
Want a less manual roasting set-up with a MUCH larger batch size?
My RK Drum Set-up!
See my homemade sample roaster!
The Soup Can Roaster!
See my Stepless Doserless Rancilio Rocky Modification (with a How-to and pictures):
Stepless Doserless Rocky Modification
没有评论:
发表评论