
Homemade Home Coffee Roasters are the Best!
For some people who roast their own coffee, off-the-shelf home coffee roasting The application of heat to green coffee seeds (beans) to create palatable material for brewing a great cup!: Coffee roasting is a chemical process induced by heat, by which aromatics, acids, and other flavor components More appliances don’t cut it. Either they don’t offer enough control of the roast, are too expensive, or just don’t allow the roaster (uh, the person that is) to express themselves.
The homemade or seriously modified commercial roasters on this page are alternately amusing and intimidating in appearance, but whatever the case, they probably work very well. And if they don’t, you can bet they will be reconfigured endlessly until they do by their respective owners.
A disclaimer on behalf of every roaster on this page: modifying electric and gas roasting equipment is dangerous. Burns, fire and electric shock are a serious possibility. When you build or modify a roaster, you assume a great deal of risk, and should be extremely cautious. You never, ever, ever walk away from a machine when it is in use. And you should unplug electric roasters even when they are off. Be safe, have fun. Most of these people are regulars on the Sweet Maria’s Homeroast List.
If you would like your roaster on this page or want me to edit your information on this page, email me directly with Homemade Homeroasters in the Subject line and by fixing this address (obvious): info—at—sweetmarias.com and attn: tom
Also see our slightly newer additions to the DIY Home Roaster examples AKA Franken Roasters!


Alan Kane’s Residential/Industrial Roasting Machine
Alan built this system from the ground up. Diamond plate sheeting, a salvaged residential 40KW furnace, a Jenn-Air commercial hood unit, and other things too technical for us to understand. He also uses a shop vac connected to a Home Depot bucket for cooling. View more at Allan’s Photobucket page.


Gene Schrier’s Motor-mounted Turbo Crazy and Cooling Tray
“The stainless unit the roaster is mounted to is a steam table insert pan upside down. It holds a 1/40 hp gearhead motor that turns 90 rpm. The motor is coupled to the stirrer by a 1/2 inch stainless shaft. The roasting chamber is a Farberware buffet electric fry pan. The unit on top is the heating unit from a Deni turbo oven. The stirrer is made from a handy chef 6 in 1 utensil.”


” Now 40% less Ugly! “
That is the claim Derek makes for this creation, originally called the “Ugly Roaster” but becoming more refined quite rapidly. Derek is in South Korea and doesn’t have access to all the roasting machines we do, so building his own has as much to do with distance than demand. It basically sits on a propane burner, cranked by a fan motor, and cooled in a strainer over a fan – even if it is ugly (it’s not) it works! The pics of the roasts look very even.
Here is Derek’s site for the roaster, and this link is the building process.


Lighting Effects Tell if the Roaster is Heating or Cooling….
Casey Dodge writes, “This is my first home roaster. I built it out of a Poppery II and various bits from the kitchen and hardware sections. I separated the heating elements and the fan and ran them through a single 3 position switch. The bodyAssociated with and sensed by mouthfeel, body is sense of weight and thickness of the brew, caused by the percentage of soluble solids in the cup, including all organic compounds that are extracted from brewing More is a stainless canister and the bowl is a Dietz lantern chimney which fits perfectly in the shortened popper chamber. I built in “ground effects” using LEDs in the acrylic legs that change from red to blue as the heating element is turned on and off. The roaster is small and can only roast about 1/4 cup of green beans at a time but it looks great and gives good results.” Visit his blog for more and his amazing craft as a maker of cutlery.


Red if the heater is on, Blue if it is cooling.
After one session roasting in a frying pan, I was hooked on roasting!
Here’s my roaster: It is custom fit to my cheap Wal-Mart grill.
It’s obviously got some familiar design elements.I welded, cut, ground, and fit each part. The drum is SS, with a fabricated funnel-shaped end and vanes from flat SS cookie pan.
I made the flanges by welding, drilling rod and holes, cross drilling, etc.I used bronze bushings in the main drum shaft.
I used parts from a hand-drive worm gear winch for the worm drive.The top assembly tips forward to pour the beans.
Hopefully everything else is pretty obvious from the pictures.
It works great. I’ve roasted about 2 pounds (it seems optimum to use about 1/2 pound per batch).This was a LOT of work- Thanks, Jim


Control-Shift-R = Roast?
Here’s my homemade PID’d West Bend Poppery I setup. The PID is a Fuji
PXR4 that can be used standalone or interfaced with my laptop via a
USB cable. It’s pretty much self-contained except for the external
variac that I use to control the fan as the roast progresses. The
roast chamber was built out of the original bakelite tube from the
Poppery, a 3″ diameter glass tube, and fitted together using hi-temp
RTV silicone. There is a screen at the bottom of the tube so you can
remove the chamber to dump the beans.
Matthew P. Williams

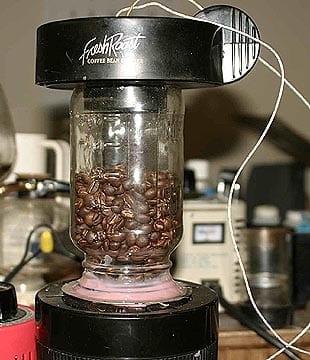
Doug Boutell’s Metamucil Roaster
Doug’s highly modified Fresh Roast +, mayo jar roasting chamber with Fuji PXR4 for roasting control. http://img22.photobucket.com/albums/v67/Metamucilroaster/? . The chassis for this is really cool…


Felix Dial I wasn’t sure if the split-wired poppers I use for coffee roasting fit under “homebuilt roaster”, but I figured I’d send you the URL to my webpage and let you decide. I’ve modified poppery2’s, poppery 1’s, 1250W wearever pumpers, and a 1400W wearever pumper that’s my main roaster. http://members.cox.net/felixdial/popper.mods.shtml I use a control station with dimmers to alter heat and fan. The webpage isn’t entirely up to date as I now use a variac to modify popper heat. I must add that I bought the variac (Powerstat 3PN116C actually) in mid-November, which was a few weeks before you started selling yours. I hope this isn’t an issue. Thanks. Felix


Ron Kyle has taken it a step further
Ron’s Drum Roaster for Barbecue
He came up with a drum design for a Barbecue Drum Roaster and now he will make one for you! I have cupped the results of his roaster and, especially the medium City+City+ roast is an ideal roast level that occurs roughly between 425 and 435 degrees Fahrenheit in many coffee roasters with a responsive bean probe where First Crack starts in the 395 to 405 degree More roasts he sent me, are excellent.


Note: Sadly, Ron Kyle passed away after a short bought with cancer. Ron took the whole idea of barbeque drum roasting to a new level, and I think his small drum-making business was guided much more by love of home roasting than anything else. Here is a note from his friend Rich below. We’ll miss Ron …
– Tom & Maria – Sept ’08
“Dear Friends,
It is with deep regret and sorrow to inform that Ronald Kyle has passed away peacefully in the mid-day hours of Wednesday, August 13, 2008 with loved ones all around. Ron was diagnosed with cancer approximately 3 weeks prior to his death. Ron was a valued and respected member of the community, and changed home roasting forever. Ron was known everywhere for his unending kindness and generosity to all. He will be greatly missed. If anyone has placed any orders with Ron, and have yet to receive your product, please email me at the link below. I will do my best to keep track of everything. No one is checking emails at the moment and it may be as much as a month before things begin to function somewhat normally, if then. So if there are any inquiries, please let me know and I will do my best to get things resolved. Please be patient as we are trying to get the wheels turning without our beloved Ron at the helm. I have no doubt he has already got a 50lb RK Drum turning in heaven! May God Bless Ron and his Family through this difficult time. -Shane Lewis (Friend), With Respect, Rich Adams”
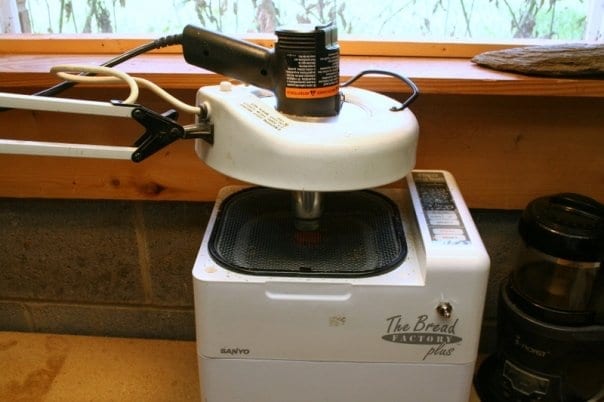
Phil Kniss “Heat Gun Bread Machine” Mash-up
Phil writes, “Here is a link to some pictures, with descriptive captions, of the roaster I set up in my garage, using a $6 thrift-store bread machine and a heat gun. Feel free to post these as you wish. I am able to roast a one and a half pound batch at a time.”Here’s a link to more pictures of Phil’s Facebook page. It’s a neat design with some great solutions. (I like using the lamp base to hold the heatgun in the right spot.)
My .02 cents. As important as good roasting, there’s also good cooling. I really like his design. Note that it has 2 screen levels, and it would cool best when the entire screen is evenly covered with coffee. If you put a little coffee on there, covering part of the screen, it pulls air around the coffee rather than through it. This is a lot like the cool bed on a bigger roaster. So you need to build this in the correct size for your batches, or block off parts of the screen for smaller batches. It’s a great, super-effective design.


The “TurboCrazy” and StirCrazy as Coffee Roaster
A long, long time ago I tried to roast coffee is a West Bend Stir Crazy popcorn popper. It seemed ideal, with a mechaincal agitation arm, a hot plate, a see-through cover. But it was underpowered and the coffee never reached roast temperatures.
Well, some people don’t give up as easy as me, and they came up with a new top for the Stir Crazy, from a convectionTransfer of heat through the bulk movement of a fluid. In the case of coffee roasting, we discuss convection in the context of heated air moving as a fluid through a roast chamber. More oven, and some other modifications to turn it into a robust, cheap coffee roasterA machine for roasting coffee. Or the person operating it! The basic requirements for a coffee roaster are a heating element that gets suitably hot and a mechanism for agitating the beans.: A mechanism for More.
Peter Bishop has a web page describing the transformation process. His roaster is pictured below…
Ron has set up a photo page for his roaster (I am including some here since Yahoo photo pages sometimes disappear). Notice all the great features here: you can see the roast, you can roast a good quantity, the roast develops at a moderate pace, and the overall build is easy and fairly inexpensive.


Finished roast. The time ranges from 10 to 14 minutes to second crackAfter First Crack, a roast reaction around 440 to 450 degrees that is distinguished by a snapping sound. Second Crack is the second audible clue the roaster-operator receives about the degree-of-roast, following First Crack. Whereas More depending on which convection oven top you use and how much you roast. First crackFirst crack in one of two distinct heat-induced pyrolytic reactions in coffee. It is distinguished by a cracking or popping sound in the coffee, and occurs between 390 and 410 degrees Fahrenheit in most coffee More is reported at 6:30 to 8:00 or so. This is allowing a good even roast progression and a nice delay between 1st and second – an indicator of a good, controlled roast development. The batch sizes are close to 1 Lb of green coffee Green coffee refers to the processed seed of the coffee tree fruit. Coffee is a flowering shrub that produces fruit. The seeds of the fruit are processed, roasted, ground and prepared as an infusion.: Coffee More! Also, the stir blade automatically reverses itself if it faces too much physical resistance.
Ron’s TurboCrazy. The Galloping Gourmet top seems to be the easiest to find and most popular among TurboCrazy modifiers
HG/DB … that is, Heat Gun/ Dog Bowl roasting.
This amazingly simple method works great, and allows you to view the transformation from green to roasted right in front of you. It is low-tech and lets you use your senses to adjust roast agitation on the fly. Plus, it’s roasting with 3 items (including the wood spoon) that you probably already have!
Here is a picture from Martin Lipton‘s photo page of the HG/dB technique in action

The noble Poppery … always an option. West Bend Poppery Mark 1 (1500 watts) is the Best!

Straightforward, easy, but increasingly hard to find. And here is my all-time favorite photograph someone sent in of their Poppery with elegantly simple modification for extending the roast chamber height, and chaffChaff is paper-like skin that comes off the coffee in the roasting process. Chaff from roasting is part of the innermost skin (the silverskin) of the coffee fruit that still cling to the beans after More collection. What more do you need?
Skillet Roasting of Coffee – No Tech!
High Tech – Low Tech – and now here is an example of No Tech! Yep, pan roasting as performed by Steve Wilson. A heavy cast pan helps distribute heat evenly and lowers the risk of scroching. This is a skill though, and I admit I am terrible at it. I cannot roast in a pan and avoid scorchingPatches of discolored burn marks on the coffee bean, due to a high-heat roast environment or other roast error.: Scorching refers to a roast error that can be discerned by inspecting the roasted coffee, where More the exterior of the bean. Well, luckily there are people more talented than I.


David Solomon had a great drum fabricating idea, and it takes about 10 minutes to make – use clamps and pop rivets with 2 metal desktop pencil organizers …voila! Rivet in a some vanes and thats it…


Alchemist John, known to all on the homeroast list, has been using a home built drum roaster for some time. Wow, purple chasis and all. No wonder it is called the Zen Roaster. It is a close kin to the professional sample roaster design and even looks a lot like the angular Primo roaster.

Mike Faberhas a unique versiion of a roaster with a 2 Lb. batch capacity! It might remind you of the Stir Crazy / Turbo Crazy designs others use, but it is unique and looks quite elegant to boot. It is a Farberware electric skillet that has a few modifications.


MiKe McKoffee is well known to everyone on the homeroast list and the creator of a seriously modified Caffe Rosto and an impressive (and yet somehow scary-looking) transformer/timer/voltage conditioner called the Frankenformer.


The Unibomber … er I mean, coffee roaster power supply, called the Frankenformer by Mr. McKoffee. Rosto with dial thermometer installed, running off a Variac
Dan Gray Unfortunately, we can’t find a cool popper like Dan’s because he is in Europe.

Here’s his comments on the Rival Popper:
The first thing I discovered was that the plastic lid that comes with the unit is completely unsuitable for it’s new role – it becan to melt after three minutes and by six minutes was distinctly soft. I threw it away after a few days.
The second discovery was that the chamber doesn’t really hold enough beans on it’s own for a decent roast. More that a couple of scoops worth and they were spat out around the kitchen this wasted alot of coffee and ment that I could only roast in small batches. I really wanted a few days worth rather that just two cups of espressoA small coffee beverage, about 20 ml, prepared on an espresso machine where pressurized hot water extracted through compressed coffee.: In its most stripped-down, basic form, this is a working definition for espresso: A small More! The solution was to glue an extension made from a food tin to the top of the unit using a non-thermal glue (superglue in my case). This enlarged the roasting chamber significantly so I could roast more and delivered chaff away from the unit.
The chaff was the biggest problem as it’s hard to fit a chaff collector and it blows everywhere. In the end I made a simple lid from a kitched seive and some meccanno. It’s not ideal and if I can find some flexible ducting i’ll modify it again so that the air is delevered away from the roaster before it’s filtered.
Scott Marquardt wrote me a note about recent updates to his 2 home made home coffee roasters, Here is his note, with links to the full pages:
I’ve done a lot of mods to my popper, but I figure some other things I’ve done are more interesting and would be something new for the page — a page that does a great job of showing the diversity of ideas in play out there. These are definitely new, and you’re welcome to grab any pics that strike you as worth adding. If you have any questions about ’em let me know.
The link is a “home” roaster only in the sense that since I couldn’t afford a road trip with the family this year, I decided to accept the invitation of a tiny farmer’s market in the area as a summer project for my 13 year old son and I. I approached a friend who’s a superb machinist (I could tell you things), and we hammered out the prototype in three weeks (with tweaks in successive weeks). It’s now technically a commercial roaster, though we’re going to finishSimilar to aftertaste, but it refers to the impression as the coffee leaves the palate. Aftertaste is the sensations gathered after the coffee has left the mouth. We combine these to form the "final flavor More the season in the red with only a lot of fun to show for it. We actually have great habitual customers, but it’s a SMALL market and I’ve invested a lot with a view to helping the market attract more interest — a tent for people to sit in, chairs, tables, etc. I may not be the world’s best businessman, but I’ve made friends and influenced people!
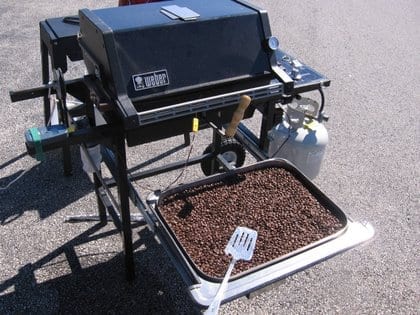


Here is a note from Bob Heydman about his gas-fired roaster:
I have appreciated all the information available on your web site and it’s links, so I am pleased to share my attempt to take my coffee roasting up to the next level. I’ve used a popcorn air popper for almost a year now and like most I had difficulties with cold weather, small batches and of course little control. I looked at the drum roasters that went inside a bbq. but I didn’t like the idea of not being able to watch the progress. I saw the video of the Jabez Burns test roaster and I liked the idea. I scrounged around for what would eventually become my new roaster. The design is crude and based on my ability and the parts I could find. My roast drum is a stainless steel basket into which I added three angled stainless steel fins (rolling the beans to the back of the drum).The lid was found at the same kitchen store and fins were attached to it to match the inside fins. I used Weber grill rotis.for the drive. I used a square key from the motor to the black iron pipe and flange that is bolted to the basket. When I want to empty the basket I open the grill and with good gloves grab the pipe and basket handle, raising it up enoughÊto clear the notch cut in the grill whichÊwill raise the rotis motor and allow the square key to slide out and the drum is easily emptied into a cooling basket. The drum has a flat area outside of the grill and under that I used a teflon skid bearing from a Maytag dryer. This material has not shown any deterioration in the dozen roasts that I’ve done. It’s important to have the bearing surface spaced away from the grill body. It wasn’t easy to take my sawsall to my old gas grill but what the heck, I wanted an new one anyway. Holes were cut for the drum and for a small duct booster fan mounted on the opposite and low side of the grill. The open drum side is elevated to aid in the upward flow of heated air which is further aided by the fan and aluminum pipe and reflectors around the burners and over them on the side opposite the drum. The lid opening is ample to view, pull samples and best of all to warm my fingers when it’s -10 F. I use a thermometer in the drum and one toward the top of the grill. This system has worked quite well with consideration for my crude fin design and the occasional trapped bean. I am enclosing a series of photos on a separate email. I have been aiming my roast times in the 15 to 20 min area. I would appreciate more information on suggested roast profiles for specific bean types. I hope this is usefull to my fellow coffee roasters. I am really enjoying learning so much about coffee. I also love being able to choose the coffee I drink like OrganicGrown without the use of artificial fertilizers, herbicides, etc.: Organic coffee has been grown according to organic farming techniques, typically without the use of artificial fertilizers. Some farms have more local Organic Certification than the More, Fair TradeFair trade is an organized social movement and market-based approach to empowering developing country producers and promoting sustainability.: Fair trade is an organized social movement and market-based approach to empowering developing country producers and promoting More, and shade grownA somewhat ambiguous term used to describe coffee grown under shade. Shade grown coffee is said to better preserve animal habitats and avoid mono-culture on farms, but the truth of this may depend on the More. I encourage everyone to give those choices some consideration. Happy roasting! Thanks Bob H. from St Cloud MN


Home Roasting in Japan: Tsujimo from the homeroast list emailed these links to Japanese sites. The array of home roasters are amazing, and presumably these are all homemade. (Some are so sophisticated it is hard to believe! Others appear to be one-offs, but for light commercial roasting.) Here are a few pictures, or you can check out the links below.
Here we have a stock Alpenrost … and then the Alpenrost drum in a new, home-engineered roast housing! Now, check out the roaster with the cover on, below… amazing!


Below are pictures of the same roaster(s). They have an open front so you can sample with a spoon, as many people do with a Probat sample roaster. Also from Japan home roaster group:

I can’t tell you exactly what I am looking at here… but it’s amazing:


A hand-crank drum in a sheet metal housing. The green attachment is a fan for air flow. Roasting in the bath tub too! There is a V2 version below that


Okay … it’s not all about roasting. Cooling is critical too. Here is a great idea to move a lot of air through a larger roast (BBQ roast quantities) and get rapid cooling. The general rule is that coffee should be room temperature in 5 minutes. This frame was built by Scott Jensen of Oklahoma.


The Lone Roaster!
This is the SS Stovetop Popcorn Popper we sell, driven by a drill – great design! Here’s the details on it from the Lone Roaster himself: Dear George,
“First, a little background. I decided to build a roaster because the Hearthware roasters I used before that (three of them) only lasted about a year or so, and then the fan would give out. I also wanted a roaster that would handle larger batches. So I went online to Sweet Maria’s (where else?) and ordered an SS Stovetop Popcorn Popper. I modified the popper and built the drill stand in March and April of 2004, and it’s still going strong.
The top picture is the entire setup in my garage. The popper is sitting on a two-burner electric stove running at 700 watts per burner. The thermometer is a TecPel 316, dual channel, Type-K digital thermometer. It also has an RS-232 serial port that can be used to connect it to my PC. With it, I can not only record and graph my roast profiles, but also the cool-down cycle at the same time. The shiny SS item next to the thermometer is a canning funnel that I picked up at my local Ace Hardware store. It works great for pouring beans into a mill that has a somewhat narrow opening.
I picked up the drill at the local Home Depot (the cheapest variable speed drill they had), and built the stand for it from scraps around my woodshop. The knob below the drill is used to control the speed. I’ve found that 60-100 rpm works best. For consistently even roasts… the smaller the batch, the higher the rpm.
Although I don’t have a picture yet, I took a somewhat different approach to cooling. Instead of putting some kind of basket on top of a fan. I built an enclosed box with a screen for the bottom. And then attached my Shop-Vac to the lid. This not only sucks a LOT of air through the coffee, but also removes virtually all of the chaff without getting it all over the garage. The box will cool the coffee from an indicated temperature of 360-380 degrees (with the temperature probe about 1/2″ or less above the hot coffee) to less than 100 degrees in about 1-min, 30-secs to 1-min, 55-secs. (depending on ambient temperatureThe temperature in a given room or space.: This term is used to describe the overall temperature in a given environment. It can potentially affect the way home roasters operate depending on how extreme the More).
In the almost two years that I’ve been using it, I’ve only encountered three problems: 1. When I first starting using it, I quickly found that the cast bevel gears were very rough and tended to catch and jam. To fix it, I smoothed the gears using my handy-dandy Dremel tool.
2. Not long after that, the plastic window fell into a batch of coffee in the middle of a roast and shriveled up into a nasty looking ball of plastic with coffee beans and chaff embedded in it. The wooden knob on the lid had a screw in it that also held the plastic window in place. The knob split from the heat and the screw fell out. I fixed it by pop-riveting a piece of thin sheet steel in place over the window opening. After the first few roasts, you couldn’t see through the window anyway. 3. Keeping it clean! The pot is easy, but because of the way it’s designed, the lid is a pain! Any advice in this area would be greatly appreciated.
It’s been quite an adventure and education roasting here in Flagstaff. We’re at an altitude of 7,000 feet and the weather can be extreme. Temperatures range from the hundreds in the summer to below zero in the winter. With a 10 to 30 mph wind, you can imagine the wind-chill! Humidity ranges from 100% down to 3%. In a single day, we can get a temperature swing from the 20’s up to the 70’s. 50 degrees in less than 24 hours. This, of course, has some interesting effects on roasting. Brewing is fun too, since water boils at about 199 degrees here.
Well, that’s my story. I have a web site www.loneroaster.com and am in the process of putting up pictures and instructions for building one of these. Feel free to check it out or ask questions. I think anybody who truly enjoys coffee should “roast their own”… Sincerely, Bill Acor, the Lone Roaster


Bob Yellin has a very interesting setup, a “heavily modified” Scirocco (if you are not familiar, it is an obsolete model made in Germany by Siemans. I think I have more pics on my coffee roaster picture page).
Here is Bob’s description: Modifications: I’ve split the heater and the fan into two separate voltage inputs and each can be plugged into the AC line or Variac(s). This took some doing! Although the photo shows the Sirocco’s original control knob, I’ve got it bypassed. I replaced the original paper chaff filters with a homemade metal mesh and drilled through for placement of a thermocouple for data logging and (now) PID-controlling the roast. I now have such complete control over the roast, I feel like this roaster is almost a lab instrument. I’ve roasted up to 150 grams very successfully but usually keep it to 100 grams. If this is not “heavily modified” enough for you, that’s fine. Just thought I’d like to show it to you anyway. -Bob

Identify These Pictures!
Okay, I get lots of pictures attached to emails and I end up (after a lot of procrastination) not knowing what picture goes with what message. These are some really interesting photos but I have no attribution for them! Email me with any leads attn Tom to info—at—sweetmarias.com
Lo-tech convection oven drum:


Roasting in a giant SS pot on what I think is a gas grill with bricks to have an even heat transfer to the coffee. Who made this? More pics?

A mystery is solved on the one below … The massive barrel below was build by Scott Jensen! Here is his note of admission, “The big BBQ roaster is mine, as is the large wood-framed cooling tray, set over a box fan. The grill is a Brinkman 4 burner Pro-series 2500. I think it’s capable of 42,000 BTU’S. It has four independantly controlled cast burners, which I covered over with ceramic tiles. The drum itself I will have to get back to you on this weekend. I’ll measure it and send the specs. It will roast 7lbs, but does it’s best, I feel, in the 4.5lb range. Thats where I have the most controll over the roast, I like to try and hit full city in about 17min. Less than 2lbs and over 5lbs I have a much harder time hitting my target. Thanks- thats a neat site! Scott”


没有评论:
发表评论